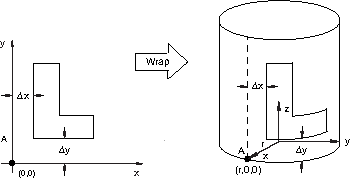
Use the Abaqus Scripting Interface method wrapMesh to wrap a planar orphan mesh part around a cylindrical surface defined by the global Z-axis and a specified radius. The planar mesh must lie in the X–Y plane, and the modeling space of the part should be three-dimensional. If necessary, you can change the modeling space of a part by clicking mouse button 3 on the part in the Model Tree and selecting Edit from the menu that appears.
The wrapping procedure will relocate a node at point (![]() ,
, ![]() ) on the planar mesh to (
) on the planar mesh to (![]() ), where
), where ![]() is the specified radius,
is the specified radius, ![]() =
= ![]() , and
, and ![]() =
=![]() , as shown in Figure 6419. A point on the planar orphan mesh part located at (0, 0) is mapped to location (
, as shown in Figure 6419. A point on the planar orphan mesh part located at (0, 0) is mapped to location (![]() , 0, 0) on the cylindrical surface.
, 0, 0) on the cylindrical surface.
Use the tools in the Assembly module to translate and/or rotate an instance of the planar orphan mesh part in the assembly.
Use the Create Mesh Part tool in the Mesh module to create a planar mesh part from the reoriented instance.
Wrap the reoriented mesh part.
Create an instance of the wrapped part and use the tools in the Assembly module to translate and/or rotate the instance in the assembly.
If you are trying to create a full 360° wrap, discretization approximations may result in a small gap between nodes along the seam edge. You must use the merge nodes tool to stitch the seam by merging pairs of nodes into a single node; for more information, see “Merging nodes,” Section 64.5.5.
The following shows an example of using the Abaqus Scripting Interface to wrap a mesh:
model = mdb.models['Model-1']
part = model.parts['Part-1']
part.wrapMesh(radius=5.0)
You can use the command line interface to enter Abaqus Scripting Interface commands, as described in “Using the Python interpreter,” Section 4.3 of the Abaqus Scripting User's Manual.